Friday, August 30, 2013

PiP the Frog

After receiving a request for e a wire and bead frog as a Christmas gift, I had to figure out how I wanted my frog to look. After seeking out many frog images, I decided to go with this cute cartoon style design of a tree frog in a meditation/prayer pose.

Figuring out a way to make his legs and arms stand out so that they didn't lose their definition and blend in with the body was my greatest challenge with this piece.

It took a few attempts, but I decided that I liked the a more delicate and spacious look for the body. Though getting all the lines and spaces perfect was a bit more than I could accomplish on this design. I still think the final product came out cute.

But, what matters most is what the customer thinks of it... I understand that she adores little PiP the frog!


I named this frog PiP. Because he is seeking Patience, Insight & Peace!


Friday, January 4, 2013

Wire Writing

I had a request to make a wire name/sign for Serendipity, Ink. At first I thought, "Wire writing? this will be so easy!" hahaha... it turned out to be a bit more challenging than I anticipated. In fact, at one point the wire broke, leaving me with the option to start all over or to figure out how to creatively mend it. After much thought, I decided to go with mending it. Can you tell where that mend may have occurred?


All in all, this project to be yet another experience to expand on creative wire usage and my techniques in wire art.


Tuesday, November 13, 2012

Easy Handmade Christmas Ornaments

Considering what kind of gifts and Homemade Christmas Ornaments to make this holiday season? 


These are just a few beaded ornament patterns that have been a favorite of mine since I was a child.


They are fun and simple to do making them a great group activity to engage in for the holiday season. 


Wishing everyone a creatively fun holiday season!


Tuesday, October 16, 2012

Beads & Butterflies

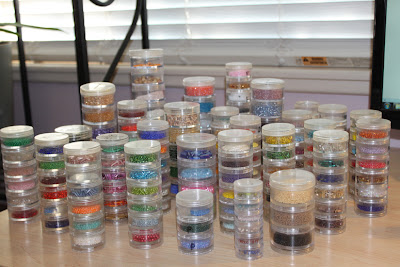
I recently was provided with someone's old bead collection. When I saw all of these beads I was pretty excited. Such an array of so many shapes, sized and colors.


I did quickly notice that they were all quite  a bit smaller from the beads that I have been using though. But, as long as they fit on the wire, it should be fine!
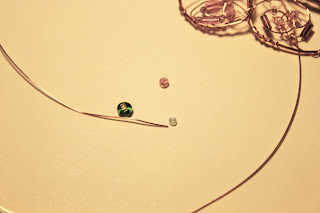
<-- Here, you can see the difference in bead sizes. The green bead is the usual 3mm size that I've always worked with before. The other two are the average sizes of the beads provided to me. One is 2mm and the other is 1mm.


The next day, I started to work on a thank you project that I would give to this person in exchange for all of these beads. I quickly learned that they were quite a bit more difficult to handle Because they are so tiny, they are not only difficult to pick up and string on wire, it also takes more of the beads to add a colorful accent to my designs.


So, my first project with these little beads, I chose to crochet the wire to fill in the butterfly design. I used this technique to make this butterfly pin. So may little beads and so much wire to fill in this tiny 2" pin.


I wasn't absolutely sure how I felt about crocheting in all the spaces on my designs. So, I made a butterfly ornament. In order to use the tiny beads, I had to make a smaller ornament than usual. My typical ornaments are about 3". But I made this one 2".


Honestly, the smaller beads were very frustrating for me to work with. But when I finally finished this project, I had to admit that they added a very delicate look to the design. So, I may continue to use the smaller beads. But, I'll also have to look into methods to help make handling them more manageable and proficient.


Wednesday, September 19, 2012

Skull n Snake Jack-o-Lantern

While filling a wire craft order for a friend and deciding what to make for her, I said "go ahead, challenge me."

With that, she decided that she would like me to make a replica of one of the carved pumpkins that her husband does, as she said it would commemorate his work. She then provided me with this image to work from.


As soon as I saw this. I thought "wow, that's some amazing pumpkin carving there." But, then a second thought came to me, that was something like "how am I going to pull this one off?"

Sometimes, I just don't know how I'm going to pull together a project until I start working on it. This was one of those. Every detail of this project was a challenge for me. I had redone every detail 2-3 times, before I felt that it was creating an essence similar to this carved masterpiece. I had tried many different style forms and techniques that just didn't make the cut with this project before settling in on the ones I ended up keeping.

But, not giving up when things get difficult, is what helps us overcome our limitations and helps us to expand in our abilities. I feel that this project has taken my crafting abilities to a new level, so I do respect being challenged in this manner. After all, I did request that I be challenged, and this was the end result of those efforts:


Monday, September 17, 2012

Goddess of Wholeness

I wanted to make a unique birthday gift for a dear friend, so I asked her what kind of a wire product and design she might be interested in.
All she mentioned to me was that she was interested in something she could hang in her window that was symboilc of wholeness.

With that in mind, I created this:


Why did I choose this design? 
Well, I did some research on wholeness symbols and came across the Cretan labyrinth, which represents a journey to one's center and then back out to the world. 
I decided to add the woman to the design as it represents the connection of feminine energy and spirituality.

Finally, the color arrangements are a representation of the chakras. The arrangements start from the center of the labyrinth as one journey's outward.

Once I got the design laid out in my mind, I knew it was absolutely fitting for her, and it has also become one of my most favorite creations so far.
When creativity flows, everything amazingly and easily comes together! 


Sunday, August 19, 2012

Broncos Fan Pin

I made a wire and bead pin for a Denver Broncos fan. I thought this would be so easy to accomplish and expected to have it done in just a few hours. After all, all I had to do was mimic the original design. Right?

So, I did an outline of the original design.


Granted I didn't smooth out the details yet, but that's because I just wasn't loving it. In fact, I wasn't happy with it at all.

That final piece of wire where I ended up spiraling it made me realize what it was I needed to do. If I don't make my creations a bit unique to my individual form of creativity, then it's not really my work of art.

So, I dissembled the whole thing, started over and came up with this design.


This one has a spiral main and I like the way the inner blue design turned out. This bead and wire pin, though for a Broncos football fan is for a lady. So, I felt like this created a bit of a softer look for a female Broncos fan.  I feel much better about my final product and learned that I can't simply duplicate other people's artwork. I have to take the idea and then make it my own.

This lesson makes this quote very fitting for this project:

Creativity is allowing yourself to make mistakes. Art is knowing which ones to keep. - Scott Adams